More Coffee Can Makeovers

   Easily Entertained - Coffee Can DIY

Nothing super crazy, but realized recently that these old cans, were perfect containers for my Q-tips and Cotton Balls!

But the Bustelo wrap didn’t really match my bathroom.  So I got out some paper from my paper drawer. I found these earthy toned ones that would go with all the baskets I have in there and picked up some clear contact paper.

Poof!

Easily Entertained - Coffee Can DIY

We Are All Mad Here – Mad Libs & Place Settings

Easily Entertained - MadLib Placemats
“Oh, you can’t help that,’ said the cat. ‘We’re all mad here.”
Lewis Carroll, Alice in Wonderland
So back to the Pinterest Shower invitations and their RSVPs.  My idea was to send out these RSVP cars where the attendees (and non-attendees) had to fill out a mad lib card on the back and send it back.  I used 4 different madlib recipes so that it wouldn’t get to monotonous.  I wasn’t totally sure what I wanted to do with the mad libs yet, but I knew I wanted to use them at the party.
Easily Entertained - Shannon shower rsvp front blog-01Easily Entertained - Shannon shower rsvp back
Here is one of the examples I one I got back:
Easily Entertained RSVP Pinterest MadLib
I started thinking it would be cool to incorporate into a place mat, so that everyone could grab a place mat and read their mad libs while they ate. I shared the idea with Taylor, and she said it would also work for a crafting place mat. I think that idea is even better.
Kitchen Paper Placemats - Kraft PaperI was inspired by these place mats from West Elm.    I thought I could type of the mad lib stories and print them out on craft paper and use those as place mats.  This became frustrating, the craft paper is difficult to print with – it is soft and flimsy.  Also my printer doesn’t print the right size for a place mat. I thought about getting some inexpensive plain cloth place mats and doing an iron on.  But before I went back to the store, I decided to look in my craft supply. And glad I did. It’s amazing the things I have that I forget about (yikes).  So I found this fun paper. Not the size and shape I had imagined, but large enough to make a place mat.
I typed up the different mad lib stories, using different fonts for different stories and also to distinguish the fill in words. One of the versions I gave a chalkboard effect.
I printed them on card stock, and used spray adhesive to attach them to the square sheets of decorative paper.
Easily Entertained - MadLib Placemats

The Crafty Can Can

As part of the Pinterest Themed Shower decorations I wanted to make use of the (very) may coffee cans I have lying around.

I drink Cafe Bustelo.

I often end up buying the can, and then for some (crafty) reason, throwing the empties in a cupboard. So when I was wandering around Pinterest looking for some DIY decoration ideas I cam across this this pin

Easily Entertained - burlap coffee can vase diyfrom Scarlet’s Table,  featuring a coffee can covered with printed burlap and used as a vase. Lovely.

I decided to try my hand at this. I tried stamping the burlap I bought at Michael s for $6.99 a roll, but to be honest it wasn’t working out too well, so decided to skip the print and just do a simple burlap. So I glue gunned the wrap to the can. Getting the top to look right was a little difficult as the edging couldn’t   lay even on the circular surface, but once filled it should look fine.  I thought it looked a little naked, so I added a bow from my ribbon collection and voila. I put some candles in them (although I would prefer flowers, just don’t have any on hand).

I since decided to keep them for myself – I have an even more pinteresting idea for the shower cans.

Inspired by this image,

colored coffee can vases diy

I envisioned that red can with a white P

on them.

What happened was – I thought I had red acrylic paint for this, but alas, I only had white, blue and yellow. My next idea was to spray paint, but I didn’t have red spray paint either. Since I am trying to pull this thing off on a budget, I decided against going to buy either of these items and decided to try and utilize my large supply of glitter glue, left over from a long ago Christmas card project.  It took many coats. I would suggest going for the spray paint, especially if you are going to do the glitter version, but I was determined.  5 coats later, I was satisfied with opacity.  I then decided to glue gun the P symbols free hand so they would pop once painted.  I then painted the P’s white with acrylic paint. I have to admit,  I wasn’t thrilled with the way this looked.  My next idea was to use a padded envelope and cut out some Ps and paste them over my sad little glue gun Ps.  This worked much better.  My only regret was using a black pen to trace, since it took several coats of white paint to cover up the bleed through. However, I think these will work well on the table at the party. Yay for coffee!

Final Product:

Easily Entertained - Pinterest Coffee Can Decor DIY

Activities You Can Eat and other DIY party snacks

wm.artpartycookies1So now I’m back to thinking about the upcoming Pinterest shower.  Taylor and I were supposed to get together for round II of the Pinata making, but we had some scheduling conflicts so hopefully we will be able to finish that project up soon. When we do, I will be posting.

As the RSVP’s are filtering in, and I began to get a sense of the number of guests, I started thinking about food. We are not doing a full dinner. Just fun Hors d’oeuvres  and desserts. We are trying to stay as close to the DIY theme as possible, so I have been looking for interactive snacks as well as fun party pickings.

I found these sugar cookies from The Decorated Cookie.com.

wm.artpartycookies3 I just want to draw all over them!  This is a must have.  The same website also has another post all about drawing on food. Worth the read.  One of the marker types recommended were these which I found on amazon.com for $14.49. I pinned these to our Shower pinboard, and Taylor was all over them too. I know they are going to impress.

Okay, so call me a dork, but when I came across these button cookies at One Charming Party, my heart started racing.  I love them.

Directions: Slice a store-bought log of sugar cookie dough into quarter-inch rounds. Place on parchment-lined cookie sheet, and bake according to package instructions. Remove from oven and let set for two minutes. Using an over-sized straw, cut two or four holes in the center of the cooling cookies. Continue to cool and serve.

However, my plan is to take this up a notch — I want to use Twizzlers Pull and Peel to thread them! Do you see it? I’m so souped about this – though fully aware this may not happen as I imagine it. But I will let you know how this experiment turns out.  One Charming Party also has free printable labels you can download, I will probably make my own though.

I’m still on the hunt for food that doubles as activities, here are some more cute options I found that might work.

These guys squeak for themselves.

Taylor found these brill apps.  Caprese Salad + pop = (WTF) YUM

I mean, we have to, right?

Perhaps I am Kebab obsessed these days….but I love the Strawberry Shortcake Kebabs below from Recipe By Photo

I mean they could totes be DIY…put your own kebabs together people.

Strawberry Shortcake Kabobs | Recipe By Photo And yes, it’s all in red, white and neutrals – our party colors!

How do you say goodbye? A book is never just a book.

I’m three quarters done with a wonderful book. Isn’t that just the saddest feeling?  I keep glancing at my tablet from across the room. Oh how I want to know what happens next, but I fear I will finish the book and lose my new friends forever. Do you know what I’m talking about?  That loss? It sounds ridiculous to describe, but it happens every time I read a book I love, which recently has been happening quite often. I finish the last line, close the book, and find myself wondering what the characters are up to now. Delusional, I know. The book I am currently afraid to read is Easily Entertained - Great books - The Snow Child by Eowyn Ivey - The Snow Child by Eowyn Ivey. Highly recommended, although I wasn’t sure I was going to love it…it took me about a fourth of the way in to get hooked, but it had such wonderful reader reviews I kept plugging. So glad I did. I am transported to the wild wonder of a turn of the century Alaska.  What a place.

Before The Snow Child, was Easily Entertained - Great books - Middlesex by Jeffrey Eugenides Middlesex by Jeffrey Eugenides. I did not read a description before I began reading the book, so I had not idea what it would be about. It was so unexpected, fascinating and well done. A Pulitzer prize winner, no wonder.  The content so easily could have been crude and overly explicit, yet it remained tasteful, honest and enlightening.

Prior to Middlesex, I was enjoying Easily Entertained - great books - Life of Pi by Yann Martel The Life of Pi by Yann Martel. While I thought it dragged in bits, I truly enjoyed the tale, and held my breath with thirst and hunger as Pi navigated the salty seas.

Before Life of Pi wasEasily Entertained - great books - Wuthering Heights by emily bronte Wuthering Heights by Emily Bronte. A classic, I know, but I had never had the pleasure.  I couldn’t put it down. Seriously if you have never read it, do it now.

One last recent favorite for now, Easily Entertained - great books - This is How You Lose Her by junot diaz This Is How You Lose Her by Junot Diaz.  A great read, however not my favorite Diaz book, but still highly recommended. His writing style is phenomenal.  Drown is probably my favorite by him, but The Brief  Wondrous Life of Oscar Wao is also incredible. He is an author not to be missed, and this is yet another one of his masterpieces.

READ THESE BOOKS NOW> and let me know your recommendations…as I will have to kiss the snow child goodbye very soon.

How much is too much? Please don’t imPEACH me.

I’m not sure.  I have found all of these delish looking(and not so delish looking) dishes incorporating peaches. But how much peach is too much  peach?

This Peach Basil & Ricotta Flatbread looks like a perfect summer party appetizer. Easy to pick up with your hands, bright and colorful, and vegetarian.

Easily Entertained - Peachy Recipes - Peach Basil & Ricotta Flatbread

From Chesapeake Taste
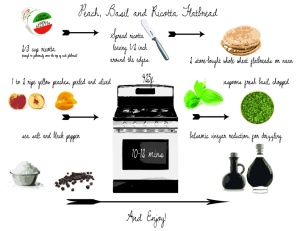
Easily Entertained - Peachy Recipes - Peach Basil & Ricotta Flatbread

Visual Recipe

*To make your own balsamic reduction: bring one cup (or more) balsamic vinegar to a boil in a small, thick bottomed saucepan over medium heat. Reduce the heat to a simmer and cook, stirring often, until the vinegar is reduced by half or more. Allow the reduction to cool, then transfer to an airtight jar and store in the pantry. Balsamic vinegar is great on everything from pizza to ice cream, caprese salads and so much more.

And for the carnivores, I thought this appetizer looked like an excellent counterpart.

PEACH-PROSCIUTTO & RICOTTA CROSTINI

Easily Entertained - Peachy Recipes - Peach, Prosciutto & Ricotta Crostini

Peach, Prosciutto & Ricotta Crostini
Bon Appétit | June 2011
by The Bon Appétit Test Kitchen

  • INGREDIENTS
  • 12 slices ciabatta bread
  • 1 ripe peach
  • 1 tablespoon fresh ricotta (preferably sheep’s milk)
  • Freshly ground black pepper
  • 4 thin slices of prosciutto
  • Honey

easy-peasy-lemon-squeezy – INSTRUCTIONS

Grill bread slices.

Halve, pit, and thinly slice peach.

Spoon about 1 tablespoon ricotta onto each toast and sprinkle with ground pepper. Tear prosciutto into feathery pieces and drape a few slices over ricotta on each. Drizzle each with honey and top with 2 peach slices.

PEACH PIE

A classic. Need I say more. How can you not make?

Easily Entertained - Peachy Recipes - Peach Pie | Je suis alimentageuse

From Je suis alimentageuse

Prep time (20mins) Cook time (60mins) Total Time (1 hr 2omins)
Ingredients
  • Your favourite pie crust recipe
  • 8 cups of peaches, peeled and sliced (chunky slices)
  • ½ cup + 2 tbsp all purpose flour
  • 1 cup sugar
  • ½ tsp vanilla extract
  • ⅓ cup unsalted butter
  • ¼ cup milk
  • ¼ cup sugar for sprinkling
Instructions
  1. (Preheat oven to 420F)
  2. Roll out the bottom half of the pie shell and gently lay onto the pie pan.
  3. Combine the peaches, flour, sugar, and vanilla together and put in pie crust.
  4. Dot the top of the mixture with little chunks of unsalted butter.
  5. Cover with top of the pie shell, pinching the sides so none of the juices can escape. Make sure you poke holes in the top of the pie so that the steam can come out when baking (and then your pie won’t explooode)
  6. Complete with a milk wash and a light dusting of sugar on top.
  7. Bake at 420F for about 15-20 minutes, then lower the oven to 350F and bake for 40-45 minutes until golden brown. You may need to turn your pie in the oven to get an evening browning.
  8. Let rest for about 15 minutes, and then dig in!

LITTLE PEACH CAKES

Okay, I will admit, this might be a bit of an overkill, put how friggin’ cute are these guys? I did something similar one Halloween to make a pumpkin cake, it turned out pretty well, and my guests were pretty impressed ;)…

Easily Entertained - Peachy Recipes - Little Peach Cakes

Little Peach Cakes from Big Red Kitchen

Ingredients

  • Mini Ball Pans
  • 1/2  Yellow cake mix
  • 1/4 cup butter,
  • 2 eggs,
  • 1/3 cup milk
  • red liquid food coloring
  • yellow liquid food coloring
  • 3/4 cup granulated sugar, divided
  • 1 cinnamon stick
  • 6-12 fresh peppermint leaves
  • 12 whole almonds
  • One batch Buttercream Frosting

How to Make and Assemble:

1. You will only need 1/2 of a Duncan Hines yellow cake mix to make 6 Peach Cakes. Mix according to package directions- 1/2 cake mix with 1/4 cup softened butter, 2 eggs, 1/3 cup milk, and 12 drops yellow food coloring. Divide evenly among the 12 greased mini rounds- about +1/4 cup batter. Bake in 350 degree oven for 8-10 minutes or until toothpick comes out clean. Let cool 2 minutes in pan then remove to wire rack. If you have one pan this can be done in two shifts!

2. While cakes are baking make the buttercream frosting and add about 12 drops of yellow food coloring to get a bright yellow. Set aside.

3. In two separate lidded containers, add 1/2 cup sugar and 12 drops yellow food coloring to one and 1/4 cup sugar and 6 drops red food coloring to the other. Cover each container and shake vigorously until the coloring is fully incorporated. Let the children do this! If there is clumping, break up with a fork and continue shaking. You should have a lovely bright yellow and a nice deep pink. You will have leftovers.

4. Break the cinnamon stick into small stems by taking a pair of scissors and placing the point into the hollow center of the stick and cutting. You will get both big and small bits, use the prettier pieces. See photo below…
5. Frost the flat side of six mini rounds, being sure to get the frosting very think along one edge. Place another mini round on the frosting and press together forming a peach. Run your finger or a small spoon along the frosting to make an indentation that mimics the crease on a peach.

6. Dip each “cheek” of the peach into the pink sugar. I am calling each “fleshy” side of the thick portion of frosting the cheek. Then roll the rest of the peach in the yellow sugar without covering the pink portion. Roll the frosting portion in the yellow sugar as well. Like this…
7. At the top of each peach, place a piece of cinnamon stick and a peppermint leaf. Arrange in a pretty bowl or on a platter. Decorate with more mint sprigs if desired.

GRILLED PEACHES WITH ROSEMARY & BALSAMIC VINEGAR

Easily Entertained - Peachy Recipes - Grilled Peaches w/ Balsamic & Rosemary

Grilled Peaches with Rosemary & Balsamic Vinegar from The Framed Table

Simple. Light, summer fare. Might be a tad too similar to first app with the balsamic & peach combo – but I just love its purity. And it looks gorge.

Ingredients:

  • Peaches
  • Fresh rosemary, chopped
  • Canola oil
  • Balsamic vinegar

To Prepare:

Cut each peach in half and remove pits.  Brush the cut surfaces lightly with canola oil.  Oil the grates on the grill and pre-heat to medium high.  Place peach halves with their cut sides facing down and grill for 5 minutes.  Flip peaches over and grill for another 4 minutes.  Remove from grill and drizzle with aged balsamic vinegar.  Sprinkle with chopped rosemary and serve as a side dish to pork chops, or as a simple dessert with a scoop of vanilla ice cream.

PEACH PICO DE GALLO

Easily Entertained - Peachy Recipes - Peach Pico De Gallo

Carla Hall of Bravo’s Top Chef and ABC’s The Chew

What you’ll need:

3 medium tomatoes, seeded and finely chopped
2 medium peaches, pitted, peeled, and finely chopped (or 1 ¼ cups frozen unsweetened peach slices, thawed and finely chopped)
½ cup finely chopped red onion
¼ cup chopped fresh cilantro
2 to 3 serrano chile peppers, seeded and finely chopped
2 tsp lime juice
1 tsp sugar
1 tsp salt
1 clove garlic, minced

How to make it:
Combine all ingredients in a medium bowl. Let stand at room temperature for one hour.

$3 Piñata Numero Uno

Another $1 Store Haul!

Here are the ingredients for the Piñata ->

Easily Entertained - Making a $3 Pinata

Supplies

Flour for paste $1

Balloons for base $1

Newspapers FREE

Tissue Paper $1

We got our original instructions from an article @ wikihow

Easily Entertained - Making a $3 Pinata

Step 1Inflate a balloon

Easily Entertained - Making a $3 Pinata

Step 2
Strips

Tear up newspaper into strips approx 6×2″

Easily Entertained - Making a $3 Pinata

Step 3 (Blow up another balloon after 1st one pops)

DO NOT OVER-INFLATE

Easily Entertained - Making a $3 Pinata

Step 4
Taylor Mixing The Paste

Combine 1 part water (2 cups) with 1 part flour (2 cups) and 1 tablespoon of salt. Mix until it becomes the consistency of thick batter.

Easily Entertained - Making a $3 Pinata

Step 5

Here we cut off a top of a box and scotch-taped it to the top of the balloon. We are hoping this will create the shape of a diamond ring stone. Jury is still out.

Easily Entertained - Making a $3 Pinata

Step 6

Thinly coat both sides of the newspaper strips with the paste, using your hands.  Apply strips to the balloon in a criss cross pattern. Wipe off excess paste to lessen drying time.

Easily Entertained - Making a $3 Pinata

Step 7

Wait patiently for the first coat to dry.  We waited (not so patiently) for 45 mins, and no luck. So lesson learned:

you need to allot plenty of time for the drying process and subsequent coats.

We hope to do the next 3 coats and tissue paper coat next time.

To be continued…

$1 Store Haul

Easily Entertained - $1 store haul - coke glassHow perfect for the “Goodbye Atlanta” party? I DIE. Can’t afford to buy enough glasses for everyone to drink out of, but think they would be fab as decor/containers.  They were only $1. I mean come on.  Also picked up some Easily Entertained - $1 store haul - ring pops (ring pops duh)for the Pinata project at the Pinterest Shower. We are thinking Diamond Ring Pinata with ring pops inside.  They were 4 for 1$ so I got 3 packs and we will need to put some other things in there to mix it up.  Any ideas? Panties? hehe.

God I love the Dollar Store.

Just Peachy Dahlin’

So – driven to distraction  I am Pinning up a storm for Bestie’s “Goodbye Atlanta” party. Obviously the first consideration needs to be venue – I believe we could easily have 60 people, so while I have been offered a house already, I think a park would be perfection. I tried looking into renting a pavilion in a public park of some sort, but I hate logistics. Ugh. Lucky me – a friend offered to help and I happily delegated her this task. hehe.

So next, I considered themes- Gone With The Wind? Bestie loves Gone With The Wind (apparently all Southern girls do) & its a sort of play on words ;)Another option – is Atlanta Skyline. Bestie loves the skyline.  She hasn’t been spoiled looking at Manhattan’s everyday the way I was. And when your from ArkanSASS, I think 2 buildings qualify as city skyline.

If we did skyline , we could use Atlanta Iconography. Like Coke this, Delta that and Peach everything. I decided the Atlanta Skyline would prove a more cohesive theme and that it would be easier to build on.

Some ideas for the menu:

Easily Entertained - Peachy Recipes - Peach Limeade

Easy Peach Limeade from Big Girls Small Kitchen sounds like a great place to start – and in a mason jar – perfection.

Easy Peach Limeade
Makes 3 1/2 cups; serves 4

To make sure that you don’t lose any of the precious peach juice, my instructions say to smush the peaches right into the limeade. Make sure your hands are clean!

Ingredients
1/2 cup plus 1 tablespoon sugar
3/4 cup freshly squeezed lime juice (from 8 limes)
2 3/4 cups water
2 ripe peaches, pitted and quartered

In a pitcher or a quart-sized jar, combine the sugar, lime, and water. Stir very well to dissolve the sugar. Add the peaches.

Now reach your (clean) hand into the pitcher and grab hold of a peach quarter. Smush it til it’s pulpy–really, right in the pitcher! Wild, I know. Repeat with the rest of the peach quarters. Shake off your hand and cover the pitcher or jar.

Place the pitcher in the fridge and leave for at least 3 hours and up to 12. Your limeade will grow peachier the longer you let it sit.

Strain the limeade through a fine mesh strainer, pressing on the solids to extract all the peach flavor.

Serve in small glasses, over ice.

OK. Sweet Tea is a MUST. I think I’ll try this one from Fabulous Finds by Tiffany. 

1 Gallon of Southern Sweet Tea

  • 5 family size tea bagsEasily Entertained - Recipes - Southern Sweet Tea
  • 1 1/4 cups sugar
  • filtered water

Method

  • {Step 1} Fill a sauce pan or small pot about 3/4 of the way full with water and put on stove, high heat.
  • {Step 2} Right before the water boils turns the heat off and put in tea bags.
  • {Step 3} While the tea is steeping pour sugar into tea pitcher. Fill pitcher about 1/2 full with hot water and mix. It’s very important to dissolve the sugar using the hot/warm water. If you fail to do this the sugar will not dissolve, instead you’ll see the sugar floating in your tea and it will end up at the bottom of you glass.
  • {Step 4} Let the tea steep for about 10-15 minutes, pour tea into pitcher and fill the rest of the way with water or ice cubes.

That’s it! Very easy. Remember not to add tea to boiling water, this could cause the tea to taste bitter.

And of course there will be Easily Entertained  warhal coke

Well that’s a start on beverages. The NYer over here will be sipping my calorie free La Croix – but who’s judging.

Would love to incorporate some Warhol in the decor too, loving this piece.

Keep Calm & Plan A Party – XOXO

Easily Entertained - gossip girl - besties

So my bestie is moving. Apparently Atlanta just isn’t good enough anymore. Actually it never was, she never liked it here.  But here is where we fell in bestie-love and I just don’t know how better to express myself, than through the infinitely wise words of Gossip Girl.

Easily Entertained - gossip girl - besties  Well, in all honesty – we didnt know eachother in highschool, and if we had- pretty sure we wouldn’t have been friends.  She –  the Valedictorium, the Prom Queen, The Class President – Serena incarnate. Me – The Mean Girl, the Smoker, the Outsider and far closer to Lonely Boy than anyone else. But alas, we do have crazy mothers (in varying degrees) and we raised each other through a formative and exhilarating time of our lives- our early twenties.   Moving to the ATL – we went through it together. And now, at the ripe age of 28 (for two more weeks) I call her my  sister.

Easily Entertained - gossip girl - besties

So you are moving on to your next chapter: Memphis TN. I hear the wooshing of the pages – turning fast. It’s hard to keep up sometimes. I AM happy for you…but I wanna vom.Easily Entertained - gossip girl - besties

VOM VOM VOM.

Easily Entertained - gossip girl - besties

Easily Entertained - gossip girl - besties

Easily Entertained - gossip girl - besties

Easily Entertained - gossip girl - keep calm

So how do I deal with this news? I keep calm and plan  a party.  A party to end all parties. A going away party.  A “Goodbye Atlanta” party. Stay tuned for more on this party plan!Easily entertained - keep-calm-and-plan-a-party-